University of Arizona Cooperative Extension Banner drop of water
[ AZ Extension Water Quality ] Youth Activities ] Glossary ]
Activity D-2: How Drinking Water is Cleaned
This youth activity is one in a series of two activities that illustrate drinking water concepts.  It is a good introductory activity and can be adapted for all grades.
Purpose:
To demonstrate the procedures that municipal water plants use to purify water for drinking.
Background:
Water in lakes, rivers, and swamps often contain impurities that make it look and smell bad.  The water may also contain bacteria and other microbiological organisms that can cause disease.  Consequently, water from surface sources must be "cleaned" before it can be consumed by people.  Water treatment plants typically clean water by taking it through the following processes: 1) aeration; 2) coagulation; 3) sedimentation; 4) filtration; and 5) disinfection.

Aeration is the addition of air to water.  It allows gases trapped in the water to escape and adds oxygen to the water.  Coagulation is the process by which dirt and other suspended solid particles are chemically "stuck together" into so that they can be removed from water.  Sedimentation is the process that occurs when gravity pulls the particles of floc (clumps of alum and sediment) to the bottom of the cup.  Filtration through a sand and pebble filter removes most of the impurities remaining in water after coagulation and sedimentation have taken place.  In most municipal water treatment plants, disinfection is the last step before distributing the water.  This activity demonstrates the first four water treatment processes.

Materials:
for each group:
* "swamp water (or add dirt or mud to water

* 20 oz. bottle with bottom fourth cut off (I use a soda pop bottle)

* teaspoon alum (potassium aluminum sulfate available at a pharmacy

* flexible nylon screen, approx. 5 cm x 5 cm (I use panty hose)

* 20 oz. large-mouth bottle with lid

* 2-3 plastic cups

* washed fine sand

* washed coarse sand

* washed small pebbles

* large beaker or jar

* a teaspoon

* a rubberband

Procedure:
  1. Pour about 1 cup of "swamp water" into a 20 oz. large-mouth bottle with lid.  Have students describe the appearance and smell of the water.


  2. To aerate the swamp water, place the cap on the bottle and shake the water vigorously for 30 seconds.  Continue the aeration process by pouring the water into one of the plastic cups, then pouring the water back and forth between cups 10 times.  Ask students to describe any changes they observe.


  3. To demonstrate coagulation, add one heaping teaspoon of alum crystals to the swamp water used in step #2.  Slowly stir the mixture for 5 minutes.


  4. The process of sedimentation is accomplished by allowing the water in step #3 to stand undisturbed in the cup.  Ask students to observe the water at 5 minute intervals for a total of 20 minutes and write their observations with respect to changes in the water's appearance.

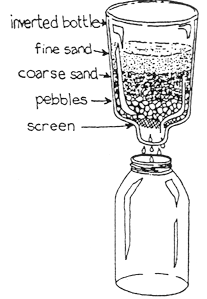
  5. schematic black & white drawing of filter - inverted pop bottle with layers of pebbles, coarse sand,
and fine sand

  6. Construct a filter from a bottle with its bottom cut off as follows (see illustration):
    1. Attach a nylon screen to the outside neck of the bottle with a rubber band.   Turn the bottle upside down and pour a layer of pebbles into the bottle; the screen will prevent the pebbles from falling out of the neck of the bottle.
    2. Pour coarse sand on top of the pebbles.
    3. Pour fine sand on top of the coarse sand.
    4. Condition the filter by slowly and carefully pouring clean tap water through the filter until it drains clean from the bottom.  Try not to disturb the top layer of sand as you pour the water.  Conditioning the filter cleans out the fine particles and prepares it for filtration (step #5).

  7. After a large amount of sediment has settled on the bottom of the cup of swamp water in step #4 carefully, without disturbing the sediment, pour the top two-thirds of the swamp water through the filter.  Collect the filtered water in a cup.  Pour the remaining (one-third bottle) of swamp water into the collection beaker or jar.  This completes the filtration process.   Compare the treated and the untreated water.  Ask students whether treatment has changed the appearance and smell of the water.  [Inform students that a water treatment plant would, as a final step, disinfect the water to kill any remaining disease-causing organisms prior to distributing the water to homes.  Therefore, the demonstration water is not safe to drink.]
Extension:
Add a few drops of food coloring to the top of the sand and have students pour water through the filter until all color has been filtered out.  Discuss water pollution and its effects on human health.
This activity was adapted by Dr. Kitt Farrell-Poe from Science Demonstration Projects in Drinking Water (Grades K-12). EPA 570/9-90-007.

wavy blue line


Issued in furtherance of Cooperative Extension work, Acts of May 8 and June 30, 1914, in cooperation with the U.S. Department of Agriculture, James A. Christenson, Director, Cooperative Extension, College of Agriculture, The University of Arizona. The University of Arizona College of Agriculture is an Equal Opportunity employer, authorized to provide research, educational information, and other services only to individuals and institutions that function without regard to sex, race, religion, color, national origin, age, Viet Nam Era Veteran's status, or disability.

For problems or questions regarding this web contact Dr. Kitt Farrell-Poe.
This document was last modified: 31-Aug-2005 .