 Soil Sampling and Analysis - October 16, 2019 Jeff Schalau, Agent, Agriculture & Natural Resources University of Arizona Cooperative Extension, Yavapai County Reliable soil testing is not expensive and can be of great value where plant nutrition problems could be limiting production. Soil test results identify nutrient deficiencies and provide guidance as to the appropriate amounts of fertilizers and amendments that should be added. I recommend testing your garden soil every few years to monitor nutrient availability and how nutrient levels may have changed over time. Your soil test results are only as good as the sample you collect. Many people have differing goals and demands for different areas of their gardens, orchards, and landscapes. In these cases, a person may choose to “stratify” the soils of these various growing spaces. Examples of stratification could be an established vegetable garden vs. a new growing area that has not had soil amendment or fertilizers. Other cases for stratification are differing slopes, land uses, or areas where soil has been deposited due to flooding. Once the area is stratified, sampling can begin. Each soil type being tested should have 10-15 subsamples collected from that area. These subsamples are combined to create a composite sample for analysis. Avoid small areas with odd conditions (manure piles, other animal waste, compost piles, etc.). Use clean sampling tools made of steel (not brass, bronze, or galvanized). Brass, bronze, and galvanized coatings may contaminate soil samples with iron, copper, manganese, or zinc which becomes problematic if you are testing for these micronutrients. Each subsample should be collected systematically and at the same soil depth (usually 3 to 4 inches). This is the depth at which most plant roots will be extracting nutrients from the soil. Other depths can be chosen depending on the crop and management objectives. Only a small amount of soil is needed from each subsample location (2 or 3 tablespoons). Use a clean shovel, trowel, and ruler or a coring tool specially designed for soil sampling. Mix all the subsamples well to ensure uniformity of the composite sample and allow them to air-dry. Use a clean, dry container to store the soil sample – paper bags are preferred. Label each composite sample clearly and keep notes of where and when the sample was collected. Most labs request one half-pound of soil for analysis (check with your lab to be sure). The expense of testing increases when additional nutrients are assayed. For baseline soil testing, it is good to test for pH, nitrate-nitrogen, phosphorus, potassium, calcium, magnesium, sodium, sulfur, and electrical conductivity. You may also choose additional micronutrient testing (zinc, iron, and manganese). Organic matter and soil texture may also be of interest to you. Nitrogen results are not extremely useful unless you have sampled at more than one depth. Nitrogen is dynamic and highly mobile within the soil profile and almost always limiting to plant growth. Nitrogen is managed through soil amendment. Upon receiving your soil test results, you are then faced with their interpretation. Most labs have relative nutrient values interpreted for you. For example, along with a quantitative result for each nutrient tested (usually listed in pounds per acre), there would be qualitative interpretations such as low, medium, or high. If a rating is low, then you may expect a growth response when adding that nutrient to the soil as a fertilizer or amendment. Soil pH is often the reason plant experience micronutrient deficiencies. Iron deficiency is common on limestone-derived soils because the alkalinity (high pH) caused by the excess calcium carbonate causes the iron to become less available in the soil. A soil test will identify these conditions and to what degree you may expect to improve the situation. Phosphorus is not highly mobile in soil. If a soil test indicates phosphorus deficiency, then amending the soil with a phosphorus fertilizer at the root zone is the best alternative. In my experience, additions of phosphorus fertilizer to vegetables and annual flowers improves plant performance in most Yavapai County soils. If you have a small garden or farm on a sizeable area, soil testing can be a very useful tool. Recently, I have been recommending the Texas A & M Soils Lab for folks interested in soil testing. It is relatively inexpensive ($12/sample for basic testing) and they provide a quick turnaround time. There are also many independent soil testing labs in Arizona. See below for links to additional resources. You can follow the Backyard Gardener on Twitter – use the link on the BYG website. If you have other gardening questions, call or email the Master Gardener help line in the Prescott (928-445-6590/prescottmg@gmail.com) or Camp Verde (928-554-8992/verdevalleymg@gmail.com) and be sure to include your name, address and phone number. Find past Backyard Gardener columns or provide feedback at the Backyard Gardener web site: http://cals.arizona.edu/yavapai/anr/hort/byg/. Photo 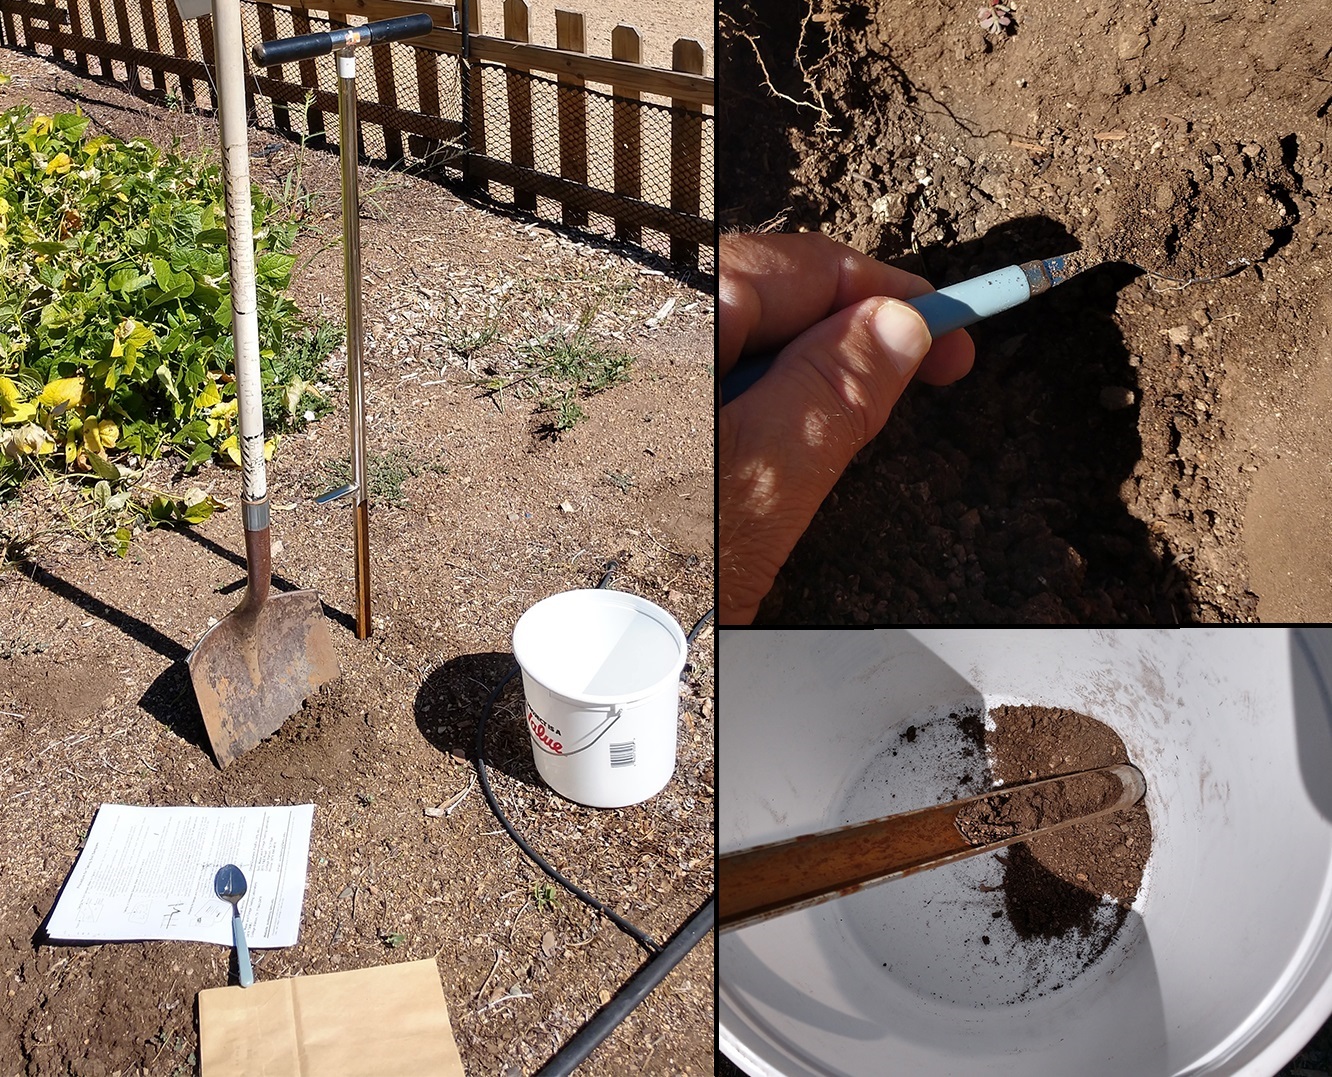 Soil sample collection tools and forms are shown on the left, using a stainless steel spoon to collect a sample after exposing the soil with a shovel on upper right, and extracting soil from a soil sampler to create a composite sample on lower right (Jeff Schalau, University of Arizona).
Additional Resources A Guide to Collecting Soil Samples for Farms and Gardens, Oregon State University Extension Service catalog.extension.oregonstate.edu/sites/catalog/files/project/pdf/ec628.pdf Laboratories Conducting Soil,Plant, Feed or Water Testing, University of Arizona Cooperative Extension extension.arizona.edu/sites/extension.arizona.edu/files/pubs/az1111-2016_0.pdf Texas A & M Soil, Water and Forage Testing Lab soiltesting.tamu.edu/ |